Tuesday, January 29, 2013

Armless, Angelic Santos!

It's always exciting (in my little world) when one of my
dolls turns the corner... and really "becomes" the personality 
it was meant to portray.  Well, it seems late into the evening 
last night... with the addition of paper "feathers" and some color 
 on his wings, a hastily painted red skull cap, a hand dyed crushed tulle
sash to match the paint on his wooden cage skirt and wings, and then 
a rusted heart and metal breastplate... he turned that corner! 
His arms?  I just removed them today to add extra paper clay 
and "beef 'em up" a bit.  Tsk! Tsk! Daryle
Saturday, January 26, 2013

Santos... has a little Attitude!

I gave him a wash of Minwax wood stain to add a little
warmth and "aging" to his wings and body.
I also added paper clay to his forearms and began 
constructing his hands with wire for the fingers.
(the wrists look articulated but are not)
The arms have a wide range of motion for positioning.
I am planning on "de-constructing" the neck where it 
meets the shoulders... to give a more natural appearance
when turned to the side.
I have been working on a metal mesh over-lay that 
fits like a jacket... but I'm not too keen on the way it
looks at the moment.  Will have to rethink that one! 

Friday, January 25, 2013

Santos Has a Face!

I had a few hours today to work on both the wings
and the facial features of this Santos.
He is a bit more whimsical in expression than I anticipated...
Whimsy is good, right?

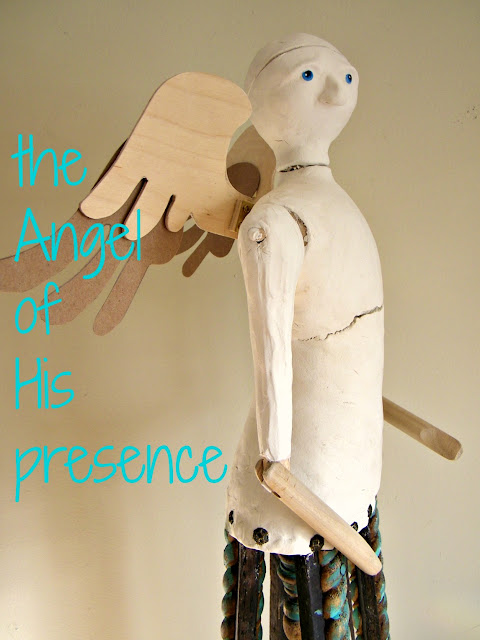
I finally pinned those lower arms at the elbows... 
mostly out of sheer frustration; 
because they kept falling off every time I moved him!
I took the pic with our ceiling fan light on... offering some back-lighting.
The effect is so ethereal and... well, angelic! 
Using a palate knife, I added some paper clay to his wooden wings,
creating a bit more texture and interest. 

Tuesday, January 22, 2013

la Angel...

I inserted hand-painted wooden eyes in the 
head and began sculpting the nose and forehead.
Ears... Cheeks... Chin... and Mouth... still to come!
The head is articulated and able to turn from side to side.
I also sculpted the upper arms using paper clay... 
they are fully articulated with the help of a wooden dowel 
inserted through the upper torso.
The lower forearms will also be articulated 
with either tiny wooden dowels or rusty wire.
I added a hint of color to the wood rope trim on the cage... 
painted it, and then rubbed it off, for that well-worn appearance.

Friday, January 18, 2013

Paper Clay & Dowels...

I always find it amazing how a bit of paper clay and some wooden 
dowels can make a doll form... come to life! 
I decided against the "pear" shaped head and went with 
Styrofoam ball that I covered, first with masking tape, 
and then a layer of paper clay.
The head is separate from the upper body... my hope is this will
add to the "vintage look" of the doll later, after painting it.  
The torso is also layered with a quarter inch of paper clay
that I added last week.  I am loving the "cracked" effect 
that was achieved when the paper clay dried hastily 
over the duck cloth armature.
I attached the wooden wings to the upper body 
using metal hinges with screws (and "Gorilla Glue"... I love that stuff!)
The jointing of the shoulder is simply a wooden dowel.  
The jointing at the elbow will be made with wire and drilled holes.
The hardwood arm forms will be covered with paper clay 
and then painted. Hands will be added as well... Ugh!

Friday, January 11, 2013

Introducing: "la Angel de Su presencia"

That's a definite "Hmmmmmm?"  
I'm just not too sure about the inverted wooden "pear" 
for the head armature. (but that is an "easy fix")
And the truth is... I haven't figured out where I'm
even headed with the duck cloth fabric body armature!

It will all work out in the end... right?
Thanks for stopping by... Daryle

Santos Cage... Grunged!

A dollop of paper clay applied with my palette knife...
A length of cord, glued in place..
A coat of wood stain...
All add up to "instant aging!"
I will introduce some color, once I get the doll sculpted.

Saturday, January 5, 2013

A Cage for the Santos!

Rough, eh?
Pay particular attention to the cracked rope trim, nail heads,
and the worn, splintered grain on the tobacco stakes...
(it's "the look" I'm going for!)
This is the first time I've designed a cage using an oval base.
For this Santos, I am envisioning a very old, vintage doll with
jointed wooden arms, well-worn painted surfaces, and lots of character.
I'm not sure the galvanized wire mesh "apron" behind the drop finial will stay... or be moved.